
Tire balancing is an important maintenance task that every car owner should know how to do. Unbalanced tires can cause uneven wear and tear on the tires, affect the vehicle’s handling, and even lead to costly repairs. Balancing your tires at a shop can be expensive and time-consuming, but with the right tools and knowledge, you can do it yourself at home. In this article, we will provide you with a step-by-step guide on how to balance your tires like a pro, so you can keep your car rolling smoothly and safely on the road. From the tools you’ll need to the techniques you should use, we’ve got you covered. So, whether you’re a seasoned DIY mechanic or a beginner, read on to learn how to balance your tires like a pro.
Preparation
Proper preparation is an essential part of doing it yourself. Before you begin, you need to make sure you have all the necessary tools and supplies you need. This includes a torque wrench, tire pressure gauge, and a level surface to work on.
You should also familiarize yourself with your tire-balancing instructions, so you can work safely and efficiently.
Gather necessary tools and supplies
If you are planning to balance them on your own, you will need to be sure that you have the necessary tools and supplies on hand. This includes a tire iron, valve stem remover tool, a torque wrench, and sealant for the rims. In addition, you will need a balancing weight kit that is specific to your type of tire.
Make sure that you get the correct size rim clip–on weights before you begin as they will be necessary during the tire balancing process. Finally, it may be helpful to have a mechanic’s stool or creeper so that you can easily access the wheels while lying down on your back.
When gathering these items together make sure to select ones of good quality as faulty tools or parts can lead to inaccurate wheel balancing or potential damage to your vehicle.
Ensure the vehicle is on a flat, level surface
Before you start, you should always ensure the vehicle is on a flat, level surface. If the car is not on a flat and level surface, it could affect the readings, your safety, and the overall effectiveness of the job.
To do this, move your car onto a flat and level surface such as concrete pavement or driveway. If possible try to position it close to where you plan to work so you don’t have to move it again later. Make sure all 4 wheels are facing in the same direction and that there is nothing blocking them before you get started.
Locate the Tire Pressure Monitor System (TPMS)
Before you start balancing tires yourself, it is important to locate the Tire Pressure Monitor System (TPMS). The TPMS is a sensor located in the wheel that helps you to monitor the tire pressure accurately.
It is important to locate the TPMS before you start the balancing process since it will be very useful when you need to check their pressure. Additionally, locating the TPMS will also help you to identify any damages to the tire that may need to be fixed.
Determine the tire inflation pressure

You should always be sure to inflate them to their manufacturer’s recommended levels since an under-inflated tire is more prone to wear and puncture.
There are several ways for you to determine the optimal inflation pressure for your tires including manually measuring with a tire pressure gauge or using a Tire Pressure Monitoring System (TPMS).
TPMS systems have become increasingly common in recent years due to improved technology capabilities and decreased costs. Most modern cars come with factory-installed TPMS sensors that measure wheel pressure, then alert the driver when any of the four tires need air. If this is not available on your car, you can purchase an aftermarket TPMS system that operates via Bluetooth or Wi-Fi and pairs with a smartphone application.
With either option, you will always know what exact tire pressure each wheel needs so that you can ensure they are all balanced correctly and remain at optimal levels while driving.
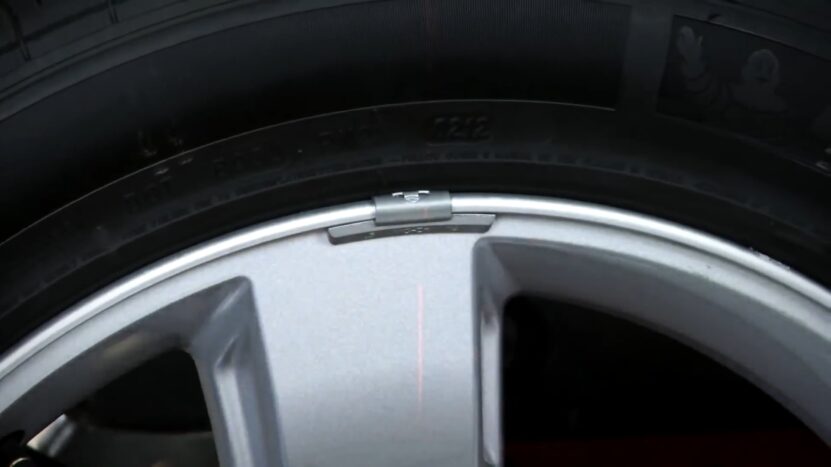
Find the TPMS on the inside of the tire
The Tire Pressure Monitoring System, commonly referred to as TPMS, is a device intended to monitor tire pressure and alert the driver if it drops below the manufacturer’s specified value. This is especially important because under-inflated ones can reduce fuel efficiency and accelerate their wear. To ensure your safety, you should check the pressure of your tires when they become low or when you get your oil changed (at least once every three months).
The TPMS is typically located on the inside of each tire. It will be most visible near the valve stem or where the tire meets the wheel rim. The device looks like a small black box with multiple wires connected to it. When inflated, these wires allow air pressure information to be sent from sensors within each wheel to an electronic control module located somewhere in the car’s body. If a drop in tire pressure is detected, an audible signal and warning light usually appear on your dashboard outlining what level of action needs to be taken.
If you do not see an electronic box near where your valve stem connects or have any doubts about what you have found, it’s best to consult a professional for help locating and diagnosing potential issues before making changes on your own.
Remove the Old Tire
To start, make sure you have the right tools available, such as a tire iron and jack. Use the jack to jack up the car so that you can access the wheels and tires.
You’ll then need to remove the lug nuts and take the tire off the rim. Be sure to handle the tire carefully so that it doesn’t get damaged.
Remove the wheel cover
Removing a tire and balancing it yourself is a relatively straightforward process, but it’s important to take safety precautions first. Make sure your vehicle is secure on jack stands and that you have the right tools and replacement parts according to your vehicle’s specifications.
If your vehicle has a wheel cover or hubcap, remove it first and set it aside. Some covers or caps can be easily removed by hand, while others may require a screwdriver or wrench in order to loosen screws. Be sure to keep track of any hardware components so they can be reused when you return the tire back and re-secure the wheel cover.
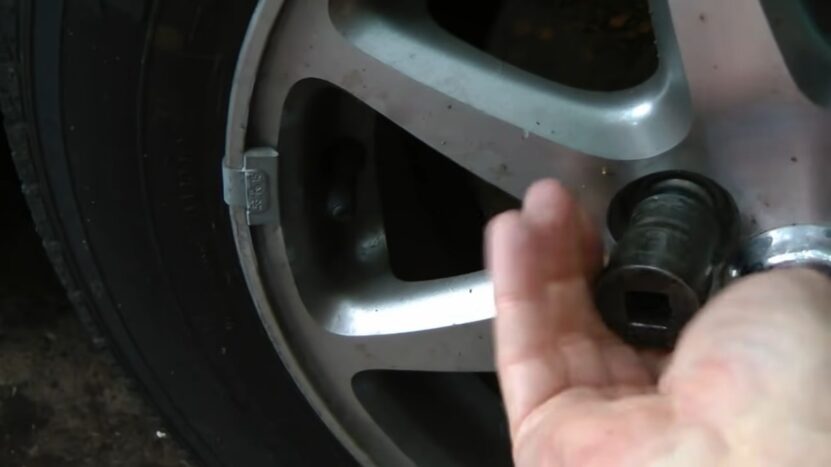
Loosen the lug nuts
It is important to make sure that you have the right size socket so that it fits correctly. If your lug nuts are especially tight, use a lug wrench and your foot on the handle for more leverage. Turn each wheel clockwise until all of them are loosened and ready for removal.
Once all of the lugs have been loosened, jack up the vehicle and lower it onto jack stands so that the wheel is off the ground. Then, re-tighten each nut by hand so that it will not fall off while you are removing the tire itself.
Jack up the car
It is essential to park your car on a flat, sturdy surface and engage the parking brake. When working with any vehicle, it is important to consider safety first. Wear safety glasses and gloves to protect yourself from any debris that could injure your eyes and hands.
Once the safety precautions are in place, begin by jacking up the car at least eight inches from the ground. Make sure you secure each side of the car with a stand and chock before crawling under the vehicle for further inspection. Ensure that you’re using a hydraulic jack designed for cars as not all jacks are designed for passenger vehicles; regular floor jacks may not be strong enough and could give way while you’re supporting the weight of your vehicle.
Remove the lug nuts and tire
Removing them is simple and does not require any specialized tools. To start, make sure to pull your vehicle up onto a flat concrete surface so you can access the car from both sides. Once parked, you’ll need a wrench or socket set to remove the lug nuts from the wheel bolts along with the tire. Place the lug wrench on each nut in an alternating pattern until all of them are loose. As you loosen each nut, use your hand to pull it off and keep them in a safe place for re-installation later on.
Once all of the lug nuts have been removed, grab onto the edge of your tire and pull it off straight towards you until it’s detached from the wheel hub assembly. Dispose of your old tire according to local regulations or try and find someone who can recycle it for you. When ready, take out the new tire and compare it against your old one— double-check that they are both exactly alike in size/diameter before continuing with the installation.
Install the New Tire
Before you install it, you must first decide which type of tire you would prefer to use. There are several types, such as radial, bias-ply, and low-profile tires.
Once you have selected the type, you can start the process of removing the old tire and mounting the new one.
Place the new tire on the wheel
Putting a new tire on the wheel is one of the most important steps in balancing your own tires. Be sure to Torque all lug nuts to the manufacturer’s recommended specifications and follow this step-by-step guide to ensure that you get a perfect balance.
- Begin by placing the tire onto the wheel and make sure that it is centered.
- Securely attach all lug nuts, making sure they are tight but not overly tight as this can cause damage to both the wheel and lug nuts.
- Once all lug nuts are secure, torque them using a torque wrench ensuring that all sides of individual wheels are torqued evenly for safety and proper functionality during rotating motions when driving or maneuvering your vehicle.
- The Center cap should then be securely fastened onto the wheel with clips or bolts (depending on the wheel type).
- Your new tire is now ready for balancing!
Reinstall the lug nuts
Once all of the old tires have been removed and the new tire has been bolted on, it’s time to reinstall the lug nuts. If any of your lug nuts have become worn, damaged, or deformed, replace them with a new set before you start. Torque down each one evenly until they are all tight.
Using a torque wrench or a breaker bar with a torque adapter can be helpful when tightening your lug nuts. Secure each nut using the specified amount of torque indicated in your vehicle’s manual or on the bolt itself. This prevents under-tightening or over-tightening and ensures proper seating and balance when driving with your new tires.
Once every nut is torqued down equally, lower your car off of the jack stands and drive it at low speeds for several miles until your new tires are balanced properly.
Lower the car back down
When the car is on the ground, lower it. Carefully lift the jack stands off of the frame of the car and bring them back to their original storage position, making sure that you store them away from any possible moving parts. Make sure to double-check once more to ensure all tools are accounted for and put away safely.
Once the car is back on the ground and supported by its own weight, proceed with replacing any wheel locks or wheel weights (if applicable). Slowly drive off the jack platform and apply steady pressure to ensure that all wheel nuts are securely tightened. Test drive your new tire at low speeds first before taking it out on busy roads and highways. Enjoy your newly replaced tire!
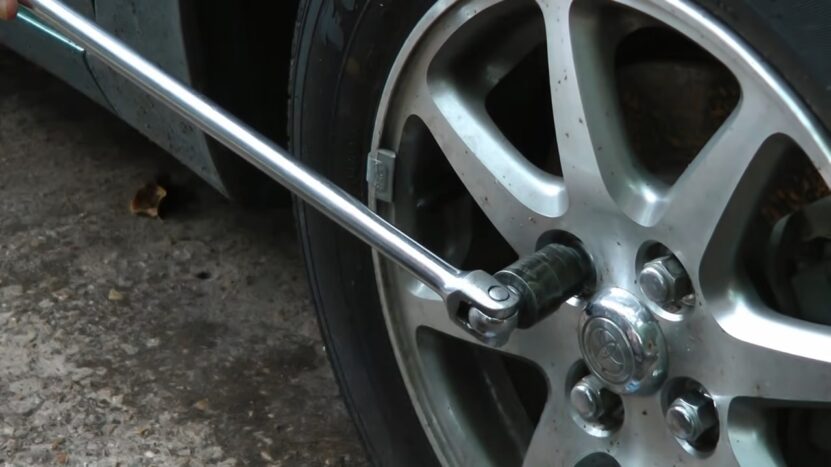
Tighten the lug nuts
Once it is securely mounted, you must tighten the lug nuts. The correct way to do this is to gradually and evenly tighten each lug nut in a rotating pattern. Start at the top and move left and right until all of the nuts are tight. Torque the lug nuts to 80 ft/lbs using a torque wrench, adjusting as needed.
To ensure even tightening around all four sides of the tire, follow a star-shaped pattern when tightening the lugs with a ratchet or power driver–this will guarantee even pressure on each side of it.
After everything has been checked and tightened correctly, take your car for a test drive to make sure everything is secure before heading out on your next adventure!
Balance the Tire
Balancing them can be an easy and cost-effective way to get your car running smoothly. Without properly balanced tires, your ride quality will suffer and you may experience excessive wear.
In this section, we will look at how to balance them so you can get your car running smoothly again.
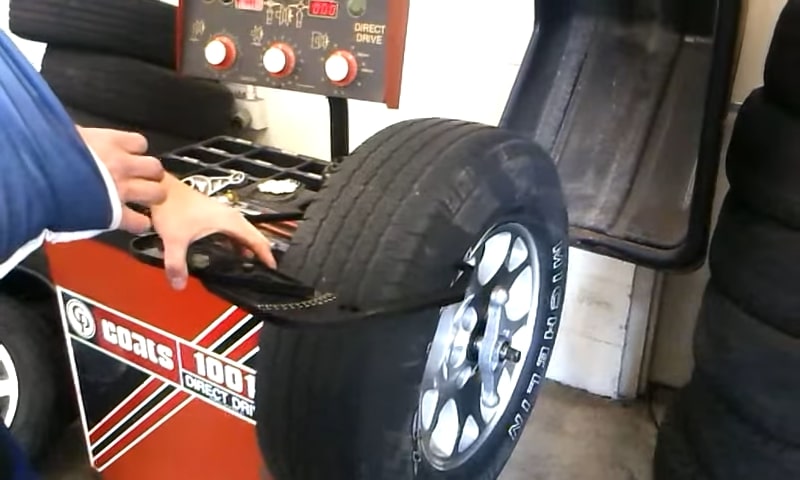
Place the tire on the balancing machine
This is an important step in regular auto maintenance. It helps to ensure the tire is operating in harmony with your car and avoiding unnecessary wear-and-tear on the tire, as well as maintain balance and safety. Learning how to balance tires yourself can save significant time and money, whether you want to balance an entire set or for a single repair.
To begin balancing a tire on your own, you need access to a special tool called a balancing machine, which can be found at most automotive shops. Using the machine will require the following simple steps:
- Start by placing it onto the balancing machine (or balancer), making sure it’s securely attached. Make certain that all valve stems are properly seated in their respective clips on the balancer plate.
- Once attached and secured, note any marks or scratch marks that existed before you mounted it in order to use them as reference points once you complete balancing tasks.
- Set up the balancer drive and cone according to the manufacturer’s guidelines as stated within your specific unit’s operation manual for accuracy and proper placement of weights (optional).
- Monitor readings given by balancing instrumentation until desired results are achieved based on the weight tolerances of each wheel (may vary from unit to unit). Some machines allow for spin correction technology which enables automatic correct placement of wheel weights during use so check your machine’s functions before beginning a job if this option is present within reachable distance.
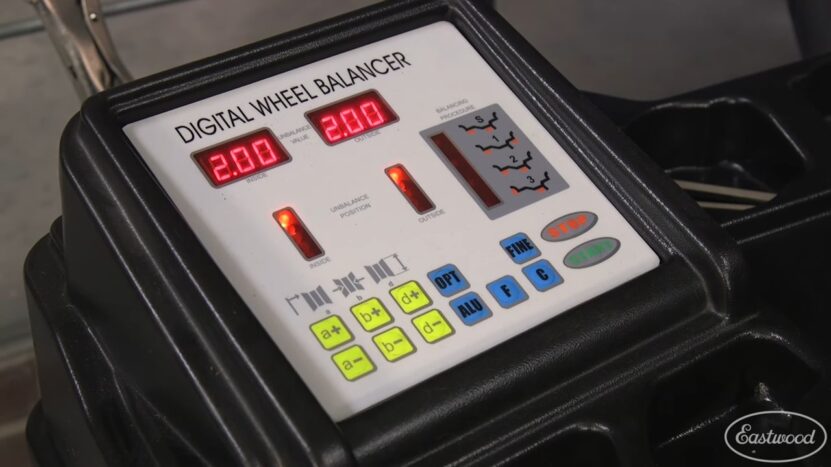
Determine the weight and location of the balancing weights
You need to determine the weight and location of the balancing weights. To do this, you will need to use a wheel balancer. There are several different types of wheel balancers available for use in home garages. Many modern wheel balancers come with a digital readout that shows the precise weight and location needed to balance your wheels.
Whether using a traditional or modern wheel balancer, you’ll want to first mark each tire/rim assembly so that when you place them back on your vehicle later, they will be placed in the same position as when they were marked. Place your tire/rim assembly onto the wheel balancer and turn it until the dots line up with each other in order for an accurate readout. The weight of each rear corner should match what is shown on the display. If not, rotate 90 degrees and try again until the correct match is found both times. Once the correct match is found, note what side needs which balance weight and where it needs to be placed onto the rim lip. You’ll also make a note of how much weight is required for that position.
The next step will be to install these balancing weights on each rim lip wherever needed using an appropriate adhesive sticker or metal clip depending on what type of weights are used according to the manufacturer’s instructions (stick-on vs clip-on). Make sure that all balance weights are securely installed before continuing further with the balancing procedure as even one loose one could potentially wreck all hard work done so far!
Attach the balancing weights to the tire
Once you have identified where the heavy spot on the wheel is located, you can attach the balancing weights to the wheel. Balance weights are typically small metal clips that can be either added or removed to adjust the weight. Your wheel should be brought up to a mounting fixture so that you can securely attach the balancing weights to it. Make sure that your wheel and tire are completely secure before attempting to attach the balancing weights.
Begin by attaching a single weight in the same general area as where the imbalance was observed before removal from your car. You may need to add or remove more weights depending on what balance your wheel requires. This can be determined by spinning your tire without brakes applied and listening for any oscillations (vibration). If an oscillation is heard, it is recommended that you add a small clip of balance weight until it is smooth when spun at moderate speeds (30km/h).
Once all clips are attached, you can spin most wheels again at higher speeds (over 80km/h) but be sure there are no items near which could fly off and cause damage. After spinning several times, take note of any imbalances which may indicate more weight needs to be added or removed until balanced equally on all sides around its circumference.
Reinstall the tire on the car
Once the weights have been taken off, the tire needs to be reinstalled onto the car. Before you start, make sure the wheel is clean and that there are no objects stuck in it – even small rocks can throw off your balance. If there’s any rust or impact damage on the rims, you’ll need to repair them first. Also, make sure that you still have enough tread for safe driving.
To start, use a lug wrench to take off the wheel lugs and remove the wheel from the car. Once you have it apart from the vehicle, you should clean both sides of the wheel so that any dirt or debris won’t interfere with your tire balancing job. If a trim weight has been applied, set it aside for now.
Now take out your new tires and mount them onto the wheels with a tire mounting machine or alternatively by hand if you’re proficient in doing so safely and correctly in line with instructions provided by your manufacturer or local garage professional (please note, this will not work if your tires are run flat). Apply just enough torque to hold each nut securely in place – too tight can prevent air valves from tightening later on; too loose will cause problems when you drive down the road.
Finally, place each wheel assembly on a wheel balancer and deflate each one (if needed) until it has all its detailing done according to the manufacturer’s instructions or local garage professional’s advice if when needed for safety reasons. After this is all done, put on your weights – making sure they are placed evenly around each side of your wheel – and inflate them up appropriately before putting them back onto your vehicle as per an appropriate torque setting according to details provided within the documentation supplied with either vehicle itself or purchased parts from suppliers such as those found via online stores, etc…
FAQs
How often should you balance your tires?
It is recommended to do it every 5,000 to 6,000 miles or whenever you notice vibrations, uneven tire wear, or a pulling sensation while driving.
Can unbalanced tires cause damage to your vehicle?
Yes, they can cause uneven wear on your tires, suspension components, and even your car’s body. It can also lead to poor fuel efficiency and unsafe driving conditions.
What are the signs of unbalanced tires?
Signs of unbalanced tires include vibration in the steering wheel or vehicle body, uneven wear, pulling to one side while driving, and a noisy ride.
Can you balance tires at home?
Yes, with the right equipment and knowledge, you can balance them at home.
How do you balance tires at home?
To balance them at home, remove the wheels, mount them on the balancer, and follow the instructions for adding or removing weight as needed.
Can you balance just one tire or do you need to balance all four?
It is recommended to balance all four tires for the best performance and ride quality.
Can balancing tires fix a shaking steering wheel?
Yes, balancing them can often fix a shaking steering wheel if the cause is due to unbalanced tires.
Can balancing tires fix a pulling sensation while driving?
Balancing them can sometimes fix a pulling sensation while driving if the cause is due to uneven weight distribution in them.
Can you reuse old wheel weights?
Reusing old wheel weights is not recommended as they may have lost their adhesive properties or become damaged over time.
Can you drive with unbalanced tires?
It is not recommended to drive with them as it can lead to unsafe driving conditions and damage to your vehicle.
Conclusion
In conclusion, tire balancing is a crucial aspect of maintaining your vehicle’s overall health and safety. An unbalanced tire can lead to numerous problems, such as uneven wear, vibrations, and reduced handling performance. Fortunately, balancing your tires can be done easily and quickly with the right tools and knowledge. By following the steps outlined in this guide and paying attention to any warning signs, you can ensure that your tires are properly balanced and your car is running smoothly. Remember to check your tires regularly and balance them as needed to extend their lifespan and improve your driving experience. With these tips and techniques, you can balance your tires like a pro and enjoy a safer, more comfortable ride.
If you’re looking for a solution to fix the peeling clear coat on your vehicle, be sure to check out our guide on Grace for Vets!