
Seat belts are an essential component of any vehicle, designed to protect the occupants in case of an accident. However, over time, seat belts can accumulate dirt, grime, and even bacteria, making them not only unsightly but also potentially harmful. Proper maintenance of your seat belts is critical for your safety and hygiene. Cleaning your seat belts is an easy and straightforward process that can be done at home with just a few simple steps.
In this guide, we will provide you with a step-by-step guide on how to clean seat belts, so you can keep your vehicle looking and smelling fresh while ensuring your safety on the road. So, whether you are dealing with food stains, makeup, or just general grime, this guide will help you restore your seat belts to their original condition and keep your car’s interior looking spotless.
Gather Supplies
Cleaning them can be a daunting task, but it is definitely worth the effort for a spotless ride.
Before you begin, make sure you have the necessary supplies on hand. This includes a brush with firm bristles, a vacuum cleaner, some mild soap and water, a cloth, and a few other items. You’ll also want to make sure you have your protective gear, such as gloves and eyewear, before starting.
Once you have all your supplies ready, you can start the cleaning process.
Detergent
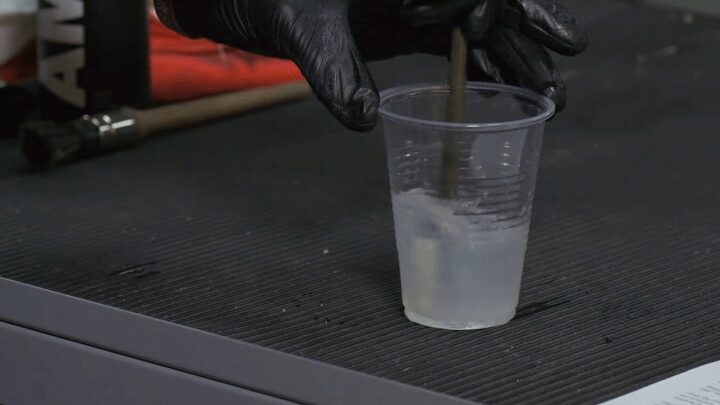
A mild detergent is necessary for cleaning seat belts, as harsh chemicals and solvents should not be used. Selecting a detergent designed for delicate fabrics like baby clothes or a mild upholstery cleaner is best. Avoid using laundry detergents meant for heavily soiled articles of clothing, as these could damage the delicate fibers and hue of your fabric or leather seat belts.
Be sure to double-check your product’s label before purchasing to make sure it is safe for use on fabric seat belts. If it does not mention seat belts specifically, test a small patch in an inconspicuous area first to ensure it does not stain the material.
Soft cloth
Before you get to work on your seat belt, make sure that you have everything you need. It is important to use the right supplies, so gather up a soft cloth, like a microfiber or flannel cloth, a mild soap and some warm water. You don’t have to soak your cloth before cleaning—a damp cloth will do—but it should be just damp enough that the soap lathers up easily.
Regular hand soap is ideal for this project as it is designed for gentle cleaning and won’t harm the fabric of your seat belt. Avoid harsh chemicals and solvents as these can damage or discolor the material of your seat belt and may even lead to tearing or fraying over time.
Vacuum

Step 2 of a spotless clean job is to vacuum the seat belts. This will help remove any dirt, dust, and particles stuck in the fibers which would just get moved around if using a brush or cloth. Use an attachment with your vacuum to reach the small crevices. To make sure you don’t miss any areas, try folding it into shapes that can reach deep into hard-to-reach spots.
Take extra care to avoid pulling too hard as this might make threads come loose or create snags when cleaning regularly.
Preparation
Before you start the cleaning process, the first step is to make sure that you have the supplies that you need to make your seat belt look new. You’ll want to have a soft cloth, mild detergent, and a stiff-bristled brush. Make sure all items that you use for cleaning will not discolor or damage the fabric.
Once you have everything ready, you’re ready to begin the cleaning process!
Remove the seat belt from the car
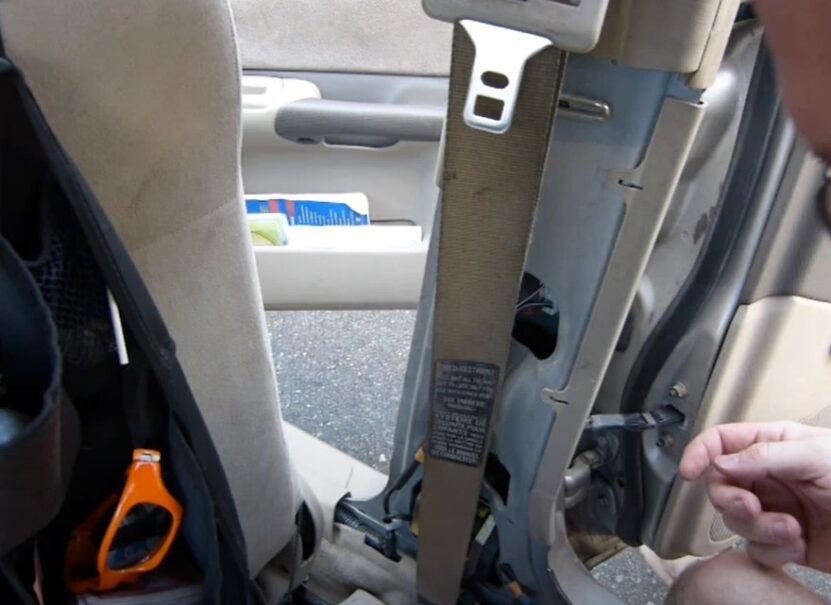
Removing the seat belt from the car is the safest way to properly clean it. Begin by pressing and holding down the button on the back of the buckle to unbuckle. If necessary, use a pointed object like an unfolded paperclip or a safety pin to depress the button, if your seat belt does not have one on top. Inserting a needle inside of space between where two pieces of slim metal meet may work better for some models of cars.
Once it is unbuckled, pull it out gently until it’s been removed from its holder. Make sure when you pull your seat belt out that you don’t yank or tug on it as this could cause damage to more sensitive systems. Once you’ve removed it from its holder, check carefully that all sides of the belt are secure – no loose stitching or metal connections – before folding and covering it with a cloth so it’s ready for cleaning later.
Vacuum the belt
Vacuuming is an important step in cleaning a car seat belt and should be done before any other cleaning. This simple step helps to rid the belt of any loose dirt, hair, and lint. Start by vacuuming the middle of the base where it connects to the seat belt mechanism first, working outward towards the belt ends.
Refrain from using attachments to reach into smaller areas; instead use an upholstery brush made for vehicles that will be soft enough to not cause damage but firm enough to make a difference. Once you have thoroughly vacuumed both sides of the belt, move on to the washing process.
Cleaning
Cleaning your seat belts is important to get a spotless ride and you may be surprised to learn just how easy it can be. In this guide, we’ll walk you through each step of the process including what cleaning supplies you need, the best techniques to use, and tips to help keep your seat belts looking new.
So let’s get started on how to clean your seat belts!
Spot clean with detergent and cloth
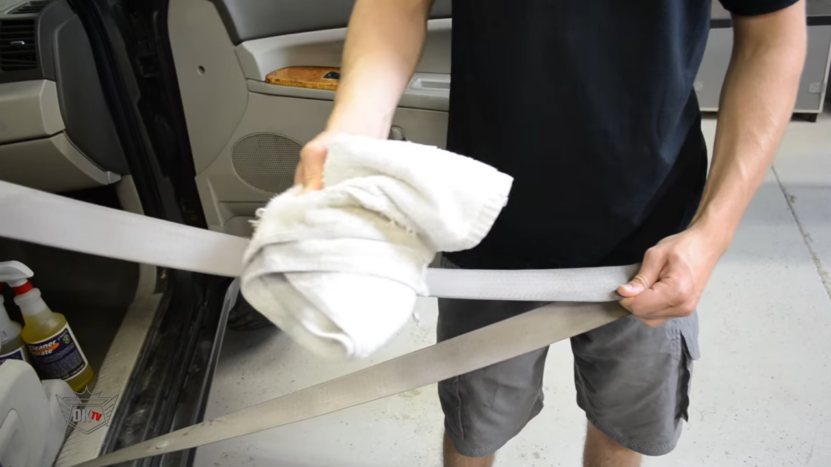
Spot cleaning with detergent and a soft cloth is effective for stains on the seat belts that are the result of makeup, food, or dust. To spot-clean your seat belts, you will need the following materials: mild detergent (or laundry stain remover), a clean soft cloth, and distilled water.
Begin by thoroughly testing any store-bought cleaner on an inconspicuous area first. To ensure that there will be no discoloration or stretching of the material, it is important to test in an area that does not show. After testing for color fastness and visible bleeding of color, if applicable, begin to spot-clean your seat belt using these steps:
- Moisten a clean damp cloth or sponge with a very small amount of mild soap or laundry stain remover.
- Gently rub over the soiled area with light pressure taking care not to stretch or pull at the fabric too much; avoid vigorous scrubbing as this can damage airbags in cars equipped with them and cause further discoloration.
- Continue in circular motions until the stain has been removed or lightened sufficiently; alternatively use a needle tip applicator bottle (dabbing motion) combined with light liquid detergent directly onto the soiled area for tougher stains The remaining detergent residue should then be removed from your belt immediately after cleaning.
- For extra protection against staining, use distilled water as final rinse rinsing until all traces of detergent have been removed completely from the fabric surface; gently squeeze out excess liquid if necessary; never twist fabric when handling wet material as this may cause shrinkage and misshape over time.
- Allow air drying at room temperature away from direct sunlight and slowly expose to daylight gradually before seating into your car again; reassure that both bottom edges side hems are flat along seams when adjusting back in place.
Rinse with a damp cloth
Using a damp cloth and water, begin to rinse the seat belts with a gentle twisting motion. To avoid creating too much friction with the fabric, make sure not to apply too much pressure while rinsing the material. When removing any dirt or particles from the surface of the seat belt, focus on one section at a time so that it can be thoroughly rinsed. Be sure to dry any excess moisture before moving on to the next section.
Once you have cleaned all sections of your seat belt with a damp cloth, move on to the next step of cleaning your seat belts, which is wiping them down with soap and water.
Allow dry airing
Once your seat belt is thoroughly scrubbed, it’s time to allow it to air dry. Take the seat belt outside, open a window, and hang the fabric of the seat belt over a rod or clothesline. Air drying is important because any fluids present that was used in the scrubbing process can act as a stain attractor if it remains on the surface.
If you need to speed up the drying process, gently hot blow-dry your seat belt making sure that you don’t apply too much heat which can damage the material. Once your seat belts are completely dry, they are ready for use again!
Reinstalling
Reinstalling seat belts after they are cleaned is an important step in maintaining a vehicle’s safety. Seat belts play an important role in keeping us safe during a crash and should be handled with care.
In this section, we’ll detail the necessary steps one must take in order to reinstall a seat belt after it has been cleaned.
Reinstall the seat belt in the car
When the seat belt has been thoroughly cleaned, it’s time to reinstall it in your car. It’s important to remember to lock the belt in place before letting anybody sit on a recently installed seat belt. Depending on the type of car, this can be done in a few different ways.
Most cars today are equipped with electronic seat belts that can easily be put back into the vehicle with a few quick steps. To begin, open up your door and use a socket wrench to loosen and remove the bolt that attaches the belt buckle to your car door frame. Then, simply slide the seat belt back into its slot and secure it in place by reattaching the bolt. Finally, look at your dashboard control to ensure that your new seat belt is properly functioning—if not troubleshoot accordingly!
For older cars with manual-style seat belts installation is usually done by hand. To do this, first, identify where are anchors that secure the existing belts in place—usually behind panels near each of the vehicle’s doors that must be removed or unscrewed.
Unfasten these anchors and then thread each individual part of your belt through one at a time until secured properly—the straps should connect all around at least one anchor securely in each location for safety reasons! Finally, adjust as needed with provided tools if necessary for a comfortable fit and check functionality again before allowing someone to sit down on recently reinstalled seat belts!
Test to ensure it works properly
Once the seat belt has been completely cleaned, you must perform a test to ensure that it works properly. To do so, follow these steps:
- Unlatch the seat belt from the retractor and make sure it is fully uncoiled.
- Slowly apply pressure on one side of the belt, pulling it away from you until the other end starts to coil again in an opposite direction against your pull.
- Repeat this step several times in order to check if it’s only retracting in one direction or both directions correctly. When you’re confident that it’s working correctly, reattach the seat belt to its corresponding buckle.
- Ensure that when pressure is released, the belt will unwind and will be ready to be used again once pulled on by an occupant of the vehicle.
- Reinstall all components of the car seat belt assembly ensuring everything is properly secured and tightened back into place following tightening specifications available in your car owner’s manual or manufacturer’s documentation for your particular car model (as applicable).
FAQs
Can I put seat belts in the washing machine?
No, they should never be put in the washing machine. The harsh agitation and high temperatures can damage the belts and compromise their safety.
How often should I clean my seat belts?
It is recommended to clean them at least once a year, or more often if they become visibly dirty.
Are there any products specifically designed for cleaning seat belts?
Yes, there are several products on the market specifically designed for cleaning them, such as cleaners and upholstery cleaners.
How long does it take for seat belts to dry after cleaning?
It can take several hours for them to dry completely after cleaning. It’s best to leave them hanging to air dry overnight.
Can I use a hair dryer to speed up the drying process?
No, using a hair dryer on them can damage the fibers and compromise their safety. It’s best to let them air dry naturally.
What should I do if my seat belts have a musty odor?
A musty odor can be a sign of mold or mildew growth. In this case, it’s best to replace them altogether.
Can I use a fabric softener on my seat belts?
No, fabric softeners can leave a residue on them that can compromise their safety. Stick to mild soap and water or specialized upholstery cleaners.
Can I remove the seat belts from my car to clean them?
Yes, you can remove them from your car to clean them, but be sure to follow the manufacturer’s instructions for proper reinstallation.
What should I do if my seat belts are damaged or frayed?
If they are damaged or frayed, it’s best to replace them altogether. Do not attempt to repair them yourself as this can compromise their safety.
Conclusion
In conclusion, cleaning seat belts is an essential part of maintaining a clean and hygienic car interior. By following the step-by-step guide outlined above, you can ensure that your seat belts stay spotless and free of dirt, grime, and bacteria.
Remember to always check the manufacturer’s instructions before cleaning and avoid using harsh chemicals that could damage the material. With a little bit of effort and regular cleaning, your seat belts can look as good as new and provide you with a safe and comfortable ride every time you get behind the wheel.